

I frequently design quilts with out borders so this challenge left me a little stumped.... I've done elaborate pieced borders before but it took a while to get my design creativity wrapped around this one!
I started by sorting through the Island Batik fabrics I had available....which was a whole lot of scrappy pieces - so how about a scrappy border?

I sorted them into lights and darks since they were from several collections. I came up with this really cool design, I sketched it out on graph paper and everything was ready to go.... and everything was ready to go.... except me ... I just didn't LOVE the design. I know that sounds so corny - but it seemed forced and every time I started to work on it... I just couldn't.
So back to the drawing board... now note, I've just spent 3 weeks NOT LOVING the original design so time is not on my side at this stage. I need to get a design and I need to get it done. Our theme is Creative Bindings and Borders - so I went to my sketch book and started looking through all the border and binding ideas I had jotted down or sketched out. So this quilt is literally a compilation of those untried ideas! It's an early experiment model! It's R & D at it's finest and you get to see it all - unfiltered :)
And to be totally honest - I like some of the ideas better than others, some I need to tweak and some you may never see again :)
So without further adieu .... I present my Broken Hearts Quilt!

Let's start on the outer edge and work our way in...
The binding is a pieced binding made from lots of small pieces - you know I said I had lots of small scrappy precuts strips. I saw this technique on a competition quilt this summer where the quilter used really small - like 1" - long pieces so the binding looked like striped fabric. I used slightly longer pieces but the concept is the same.
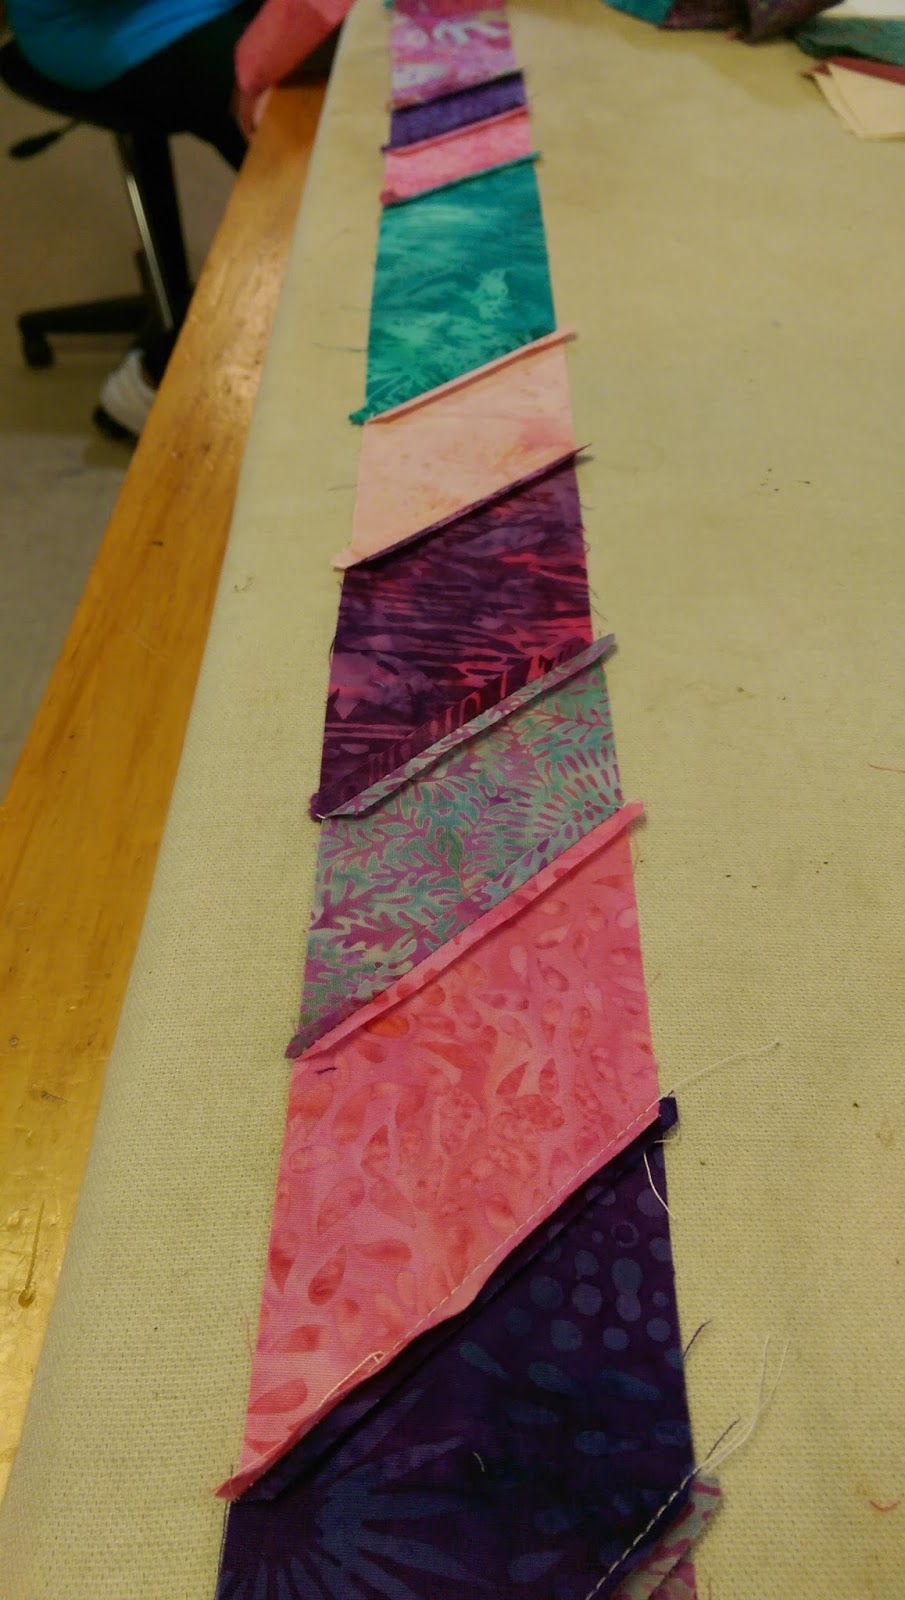
This technique results in a bulkier, thicker binding due to all the seam allowances. I trimmed each mitered seam to a scant 1/4" and pressed the seam allowances open, making sure to trim the dog ears. I used 2-1/2" wide strips to help accommodate the extra bulk. Next time I might try 2-3/4" so I have a wider binding. I think it turned out pretty cool. What do you think? It has lots of possibilities such as using smaller pieces like the inspiration quilt or using one color with little bits of a second color randomly placed for accent.

Next is the bright pink flange. I frequently add a flange before binding to add a bit of color at the edge of the quilt. This time I used a corded flange for added dimension. I cut the flange at 1" width and pressed it half lengthwise. I inserted the cord and used the adjustable zipper foot that came with my new Brother sewing machine to baste the cord in place.
Now onto the quilt top. I have three individual borders which measure 2" - 5" - 2" with floating hearts raw edge fusible appliqued across them. The part from my jottings was making the appliques not from a single piece of fabric but from pieced fabric. Since I was testing this out - I wanted to make it as simple as possible (remember - I'm on a deadline here !) so I cut my appliques using an AccuQuilt die cutter.
I grabbed some of my scraps and cut them into 3" squares and stitched 4-patch units.

Next I fused Steam-A-Seam 2 fusible interfacing from The Warm Company to the wrong side. I ran them thru the die cutter which made quick work of cutting all the heart shapes.

After fusing, I machine appliqued each heart in place with a contrasting color of Aurifil thread.
I want to try this technique again using improv piecing and then cutting my shapes. I think it will result in a crazy quilt look - which I love and will take advantage of some of my smaller scrap pieces. It might be fun to add decorative stitches too!
Moving inward to the center section of the quilt, I have a 9" finished star block surrounded by two pieced borders that build off the center block.

Wow - that's a lot of borders and binding options for you! Let me know which one you like best... Leave a comment and be sure to follow me on IG @masterpiecequilting and like my Facebook page. I will select one lucky winner on November 1st to received this bundle of Island Batik precut 5" squares.

Looks great. The whole idea is fun and a great mix. Good job.
ReplyDelete