Who doesn't love a good fussy cut? That single centered motif precisely cut and pieced so perfectly into your project.
It looks easy enough but then you try it and discover it isn't quite as easy as you think! Is it worth the extra work?
Yes, fussy cutting is extra work.
Yes, fussy cutting takes more fabric.
But it gives a look you can't achieve in any other way!
Fussy cutting elevates your work. It takes the boring and turns it into something spectacular. It gives your project an artistic flair.
If you have never tried fussy cutting fabric before, give a try. It's like eating a new vegetable as a child - try it. You might like it or if you don't, you can honestly say that you have tried it :)
For both seasoned and novice fussy cutters, I've pulled together my Top 5 Tips for Fussy Cutting Fabric.
1. If you are purchasing a fabric that you know you are going to fussy cut, buy extra.
If there is a specific motif in a print that is calling your name, then purchase enough yardage so you can get the desired number of motifs from the yardage you are purchasing. If necessary, count the motifs while the sales staff is unrolling the bolt. If purchasing online, leave a comment with your order or reach out in advance to the retailer with your request. As a shop owner on Etsy, I'd rather have the conversation in advance with a customer than have disappointment after the fabric is cut and shipped.
2. Press thoroughly, starch and then cut. If you are fussy cutting straight from the yardage - lightly starch and cut out the motifs. There is nothing more frustrating than trying to cut a precise cut from soft limp fabric.
Many times achieving that perfect fussy cut will result in edges that are cut on the bias and the starch will help keep those edges from stretching.
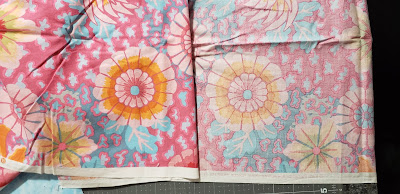
The piece on the right has been pressed and starched and is much easy to work with than the pieces on the left with bolt folds still in them.
3. Cut an oversized block from the yardage and then starch and trim to exact size.
That is the process I used in the above photo. My finished motif needs to be 3-1/2" square and I cut a generous 4" square from the fabric. After starching, I'll trim it precisely to size.
4. Sometimes it is easier to see the motif on the back side of the fabric. I know that sounds weird - but check it out.
On the left is the right side of fabric and it's a bit busy - which is exactly why I love this piece but the busy-ness can make it hard to see exactly where to cut. When I look at the back side of the fabric, the lines of the motif are more dominant which makes it easier to see exactly where I need to cut.
5. Use tape on your cutting grid to make it easier to see the motif size that you are cutting. It helps focus your eye for exact placement.
When you are finished, admire your work. I'm just loving these fussy cut flower motifs.
If you would like to see more of my patterns, tips and techniques delivered weekly to your inbox, be sure to sign up for my weekly Masterpiece Quilting Studio News email. It's free of charge and I promise your email is safe with me.


No comments:
Post a Comment